Fig & Hazelnut Frangipane Tart Recipe

Discover this delectable Fig & Hazelnut Frangipane Tart from “Recipes for a Lifetime of Beautiful Cooking” by Danielle Alvarez and Libby Travers.
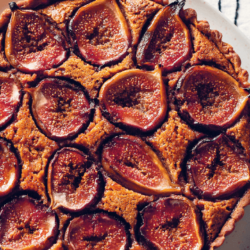
We really amp up the hazelnut flavour by first making a hazelnut praline, which is then used to make a traditional frangipane. The combination of figs with hazelnuts in a crisp, sweet tart shell is pure bliss – the smells coming out of your kitchen will leave you intoxicated (in the best way).
Images and text from Recipes for a Lifetime of Beautiful Cooking by Danielle Alvarez with Libby Travers, photography by Alan Benson. Murdoch Books RRP $49.99.

Makes: 1 tart, the larger enough for 12–16 slices, or the smaller enough for 8–10 slices
Active time: 1 hour
Inactive time: 2 hours 30 minutes
Kitchenalia: 30 cm (12 inch) fluted tart tin with removable base (see note), Stand mixer fitted with the paddle attachment, food processor
- 1 baked Sweet tart shell (see below)
- 11–12 ripe figs, cut in half
- 1 tablespoon white (granulated) sugar
Hazelnut Frangipane Ingredients:
- 140 g (5 oz) hazelnuts
- 80 g (2¾ oz) soft brown sugar
- 1 tablespoon water
- 130 g (4½ oz) unsalted butter, at room temperature
- 80 g (2¾ oz) white (granulated) sugar
- Pinch of fine sea salt
- 2 eggs, at room temperature
- 2 teaspoons vanilla extract
- 80 g (2¾ oz) plain (all-purpose) flour
To serve – Crème fraiche
Hazelnut Frangipane Method:
- Before you begin: You’ll need to prepare a Sweet tart shell (see below) for this recipe.
- The frangipane can be made a day or two in advance and kept in the fridge, but it will need to come out of the fridge at least 30 minutes before using, so you can easily spread it into the tart shell. The baked tart is best eaten on the day it’s made.
- Prepare your Sweet tart shell and allow it to cool.
- For the hazelnut frangipane, preheat your oven to 150°C (300°F) fan-forced. Place the hazelnuts on a baking tray and toast them for 30minutes. If using hazelnuts with the skin still on, once toasted, tip them into a tea towel and use the tea towel to rub as much of the skin off as possible. Leave the oven on.
- Line a baking tray with baking paper and set it aside. In a small stainless-steel saucepan, heat the brown sugar and water over a low–medium heat, stirring occasionally using a heatproof spoon or spatula, until it’s smoking and has turned a deep shade of amber. Add in the hazelnuts and stir to coat. If your caramel turns grainy after adding the hazelnuts, simply continue to cook it until the sugar melts again and forms a glossy sheen on the nuts. Carefully tip the praline onto your baking tray, spread it out, and allow to cool completely.
- Once cool, break the hazelnut praline into pieces and process them in a food processor until a thick paste forms. Combine the praline paste in a bowl with the butter, white sugar, salt, eggs and vanilla. Add in the flour last and stir to just combine. Set aside.
- Increase your oven temperature to 160°C (320°F) fan-forced.
- Spread the frangipane over the base of the tart shell, smoothing it out with an offset or regular spatula. Nestle the figs into the frangipane, cut-side up. Sprinkle the tablespoon of sugar over the figs and bake for 50–60 minutes, until the top is golden and the figs are jammy.
- Allow the tart to cool, then serve with crème fraîche.
- Note: For a smaller tart, simply use a 23 cm (9 inch) fluted tart tin with a removable base and halve the frangipane recipe and the number of figs. Reduce the baking time to 40–50 minutes.
Sweet Tart Shell:
This unusual recipe for pastry uses honey, white and brown sugar to produce a beautifully burnished and crisp, yet tender, tart shell. It even stays crisp the next day after a night in the fridge – the holy grail!
Makes: Enough dough for 1 fluted tart shell, ranging from 23 cm (9 inches) to 30 cm (12 inches) depending on the tart you’re making
Active time: 25 minutes
Inactive time: 1 hour 30 minutes
Kitchenalia: Fluted tart tin with removable base, either 23 cm (9 inches) or 30 cm (12 inches), stand mixer fitted with the paddle attachment
Ingredients:
- 150 g (5½ oz) unsalted butter, at room temperature
- 35 g (1¼ oz) soft brown sugar
- 35 g (1¼ oz) white (granulated) sugar
- 50 g (1¾ oz) honey
- 250 g (9 oz) plain (all-purpose) flour
- 1 teaspoon fine sea salt
Method:
- In the bowl of a stand mixer fitted with the paddle attachment, combine the butter and both sugars on low speed, stopping and scraping down the bowl with a spatula as needed. You are not trying to aerate here, so this will happen in about 30 seconds. Add in the honey and mix to combine.
- Mix the flour and salt together in a separate bowl.
- Add the flour mix to the stand mixer and bring the dough together on a low–medium speed, stopping and scraping the bowl as needed to bring it together evenly.
- Scoop the dough onto a large sheet of baking paper laid out on your bench and cover it with a second sheet of baking paper. Use a rolling pin to roll your dough to a thickness of 2 mm (1/16 inch) – very, very thin! If your dough is too soft, making it difficult to roll evenly, place it in the fridge for 15 minutes to firm up slightly, then continue to roll. Place the rolled sheet of dough in the fridge for 10 minutes to chill.
- Remove the top sheet of baking paper and proceed to peel off as much of the pastry in one piece as you can from the bottom sheet. Lay the pastry into your fluted tart tin. It will tear and break into pieces, but you can patch that up and puzzle it back together in the tin as you go.
- The important thing here is to take your time. This is the longest step in the process, but the resulting super thin, crisp shell is a thing of beauty. You’ll have excess dough that we’ll use later to patch any cracks that appear while baking (any excess beyond that can be shaped into a disc, wrapped and frozen for a few smaller tarts another day). Press the dough into the fluted edges, leaving an overhang of around 1 cm (½ inch) (this will help guard against shrinkage as the dough relaxes). Place in the fridge to chill for 30 minutes.
- Preheat your oven to 155°C (310°F) fan-forced.
- Remove the tart shell from the fridge. At this point, you can trim the overhanging dough by running a small paring knife along the edge of the tin. See if you can’t make the edges a tiny bit thinner by lightly pushing the dough upwards slightly past the edge of the tin with your finger. This ensures you won’t have a shrunken tart shell. Cover the dough with a sheet or two of aluminium foil and gently press it into the pastry, being sure to cover the base and the sides. Weigh the base of the pastry down using pie weights or dried rice or beans, or a mixture of both.
- Bake for 35 minutes, then carefully remove the foil and pie weights. Use the excess dough to patch up any cracks that have appeared (there may not be any). Bake for a further 10–15 minutes, until the base is completely and evenly golden. Remove the pastry from the oven and leave it to cool in the tin before you proceed to fill it.

Discover More Recipes
