Natalie Paull’s Hazelnut Layer Cake with Roasted Cherries & Honeycomb Recipe
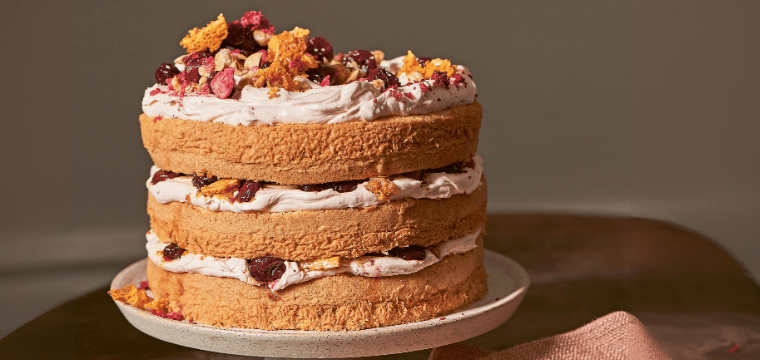
This Hazelnut Layer Cake with Roasted Cherries and Honeycomb by Natalie Paull, is the ultimate showstopper for any special occasion.
Imagine layers of soft, nutty hazelnut sponge, each brushed with a touch of hazelnut liqueur for an added depth of flavour. Between the layers, vibrant roasted cherries burst with juiciness, while honeycomb brings an irresistible crunch that slowly melts into golden pools of sweetness. Together, these elements create a dessert that is as stunning to look at as it is indulgent to eat.
This is an edited extract from Beatrix Bakes: Another Slice by Natalie Paull (Hardie Grant Books, RRP $50). Available in stores nationally. Photographer: © Rochelle Eagle

Makes A 20 cm (8 in) round cake with 3 layers.
Takes A busy 3 hours to make all the components from scratch, OR make the buttercream, honeycomb and roasted cherries the day before. Then bake and cool (11/2 hours) and assemble (20 minutes) on the day.
Keeps Best eaten at room temperature the day it is assembled. Can be chilled overnight, but remove from the fridge a few hours before serving.
- cooking oil spray
- 1 × batch German Brown Butter Buttercream
- 100 g (3½ oz) Leatherwood Honeycomb (make a whole batch; you won’t use it all, but it’s easier to make that amount. Freeze the rest for topping ice cream)
- 140 g (5 oz) Olive-oil roasted sweet cherries
- 2 g (1/16 oz) freeze-dried cherries (optional) and/or 8–10 fresh cherries

Hazelnut Cake
Ingredients:
- 170 g (6 oz) raw hazelnuts
- 150 g/ml (5½ oz) extra-virgin olive oil
- 120 g (4½ oz) egg yolk (from approx. 6 eggs) + 270 g (9½ oz) egg white (from approx. 8 eggs)
- 60 g/ml (2 oz) orange juice
- 5 g (1/8 oz/½ teaspoon) vanilla paste
- 130 g (4½ oz) soft plain (all-purpose) flour
- 275 g (9½ oz) caster (superfine) sugar
- 10 g (¼ oz/2 teaspoons) baking powder
- 3 g (¹⁄₁₀ oz/heaped 1/4 teaspoon) fine sea salt
- 3 g (¹⁄₁₀ oz/heaped 1/4 teaspoon) cream of tartar
Method:
For an organised head start, make the buttercream (chill), honeycomb (freeze) and roasted cherries (chill) the day before. Alternatively, these can be made while the cake is cooling.
To make the cake, preheat the oven to 150°C (300°F). Toast the hazelnuts on a shallow baking tray for 20 minutes until medium brown. Cool them in the fridge ( or in the freezer if you’re in a rush).
Lightly spray the base and sides of three 20 cm (8 in) round × 5 cm (2 in) deep cake tins with cooking oil. Place a circle of paper in the base of each tin, spray again and lightly dust the sides with flour, tapping out any excess.
When the nuts have cooled, rub most of the skins off and set 20 g (3/4 oz) aside for the topping. Whiz the remaining 150 g (51/2 oz) in the food processor to a thick and dr y peanut butter–like consistency, then scrape into a wide mixing bowl with the oil, egg yolks, orange juice and vanilla paste. Set aside.
Weigh the flour, 200 g (7 oz) of the sugar, baking powder and salt into a small bowl and set aside with a sieve on top. Bump the oven temperature up to 160°C (320°F).
Put the egg white, remaining 75 g (23/4 oz) of sugar and cream of tartar in the bowl of an electric stand mixer. Using the whisk attachment, whip on speed 8 (under high) for 2–3 minutes until the meringue is stiff and white.
While the meringue whips, sift the dry ingredients over the hazelnut and oil base and mix with a stiff spatula to make a thick paste, then gently and thoroughly fold in one-third of the meringue until almost fully incorporated. Gently fold in the remaining meringue with a hand whisk and do a final fold with a plastic spatula until no white streaks remain. Divide the batter between the three tins – 380 g (131/2 oz) per tin – and smooth the tops.
Transfer to the oven and bake for 20–25 minutes until the cakes have risen, have a slight dome and are biscuity brown. A skewer inserted into the centre should come out clean (internal temperature is 95°C/203°F).
Cool the cakes in their tins on a wire rack for a minute. Cut around the sides to loosen the cake from the tins. Place a second wire rack over each cake and carefully flip them upside down. Remove the tins and paper and leave the cakes top-side down on the racks to cool completely. If you can rest the racks over the sink to get better airflow, do!
To get ready for assembly, bring the buttercream to a softly whipped consistency and chop 100 g (31/2 oz) honeycomb into small shards. Follow Lovely layer cake-ing (page 144) for a three-layer cake. Use 150 g (51/2 oz) of softened buttercream between each layer. Make a shallow nest for the cherries and honeycomb in each buttercream layer.
Leave naked (as pictured) or fully coat for a traditional look.
Cut the reserved hazelnuts in half. Arrange a relaxed smattering of olive oil cherries, hazelnuts and freeze-dried cherries (if using). You can add extra shards of honeycomb on top, but be aware any honeycomb on top will soften. Serve at room temperature so the cake and buttercream textures are their birthday best.
Adaptrix:
Change the nut type in the sponge (exact weight for weight) and the fruit. Keep the buttercream and honeycomb. Hey presto, new cake who dis?
Almond: Toasted raw (skin on) almond cake and pair with Olive-oil roasted sweet cherries, One-pot passionfruit curd or roasted apricots.
Walnut: Toasted walnut cake with fresh raspberries, toffeed fresh fig, or slow-roasted quinces.
Pecan: Toasted pecan cake with toffee banana (omit the honeycomb).
German Brown Butter Buttercream
(or GBBBC)
I love the United Nations of buttercreams – Swiss is egg white heated with sugar, French is egg yolk, American is powdered sugar and butter, Italian is Italian meringue–based (hot sugar syrup on egg whites) and then there’s my new favourite, German – made with a thick pastry custard/pudding-esque base with butter whipped in. I adore it for its velvet texture and mild sweetness. A little crème fraîche brings a balancing tang.
Ingredients:
- 50 g (1¾ oz) caster (superfine) sugar
- 20 g (¾ oz) cornflour (cornstarch)
- fine sea salt 1 g (⅟₃₂ oz/1/8 teaspoon)
- cream (35% milkfat) 40 g/ml (1½ oz)
- egg yolk 40 g (1½ oz) (from approx. 2 eggs)
- full-cream (whole) milk 200 g/ml (7 oz)
- 4 g (1/8 oz/½ teaspoon) vanilla paste, or ½ vanilla bean
- 240 g (8½ oz) unsalted butter, squidgy (at approx. 20°C/70°F)
- 40 g (1½ oz) crème fraiche (at approx. 20°C/70°F)
Method:
In a medium bowl, weigh the sugar, cornflour, salt and cream. Add the egg yolks last and hand whisk to make a creamy paste. Stream the milk in then the vanilla (paste or scraped pod and seeds) and whisk well. Scrape the mix into a 20 cm (8 in) saucepan.
Adding the egg yolks last helps stop them forming little hard orange ‘cooked’ granules at the start.
Place the saucepan on a medium–high heat and hand whisk at a slow pace to allow the heat to suffuse through the mix. Work the small balloon whisk into the corners of the saucepan (where the custard thickens first). After around 3 minutes of whisking, the custard will start to look like a creamy liquid.*
Speed up the whisking now – the custard will thicken fast. It will look lumpy but just whisk quickly and it will all come together into an evenly thick paste in another 1 minute.
Don’t give up at the lumpy stage. It is NOT failure – just the custard cooking at different rates. Keep whisking to achieve silky, evenly thick success.
As soon as it looks smooth and thick, slow down the whisking and wait for a few burp-like bubbles to pop over the surface. It’s a super thick custard and your whisk should leave obvious furrows as it moves through the mix.
Letting the custard visibly boil means the starches are fully cooked, making a thick, stable custard.
Take the pan off the heat and remove the vanilla pod (if using). Scrape the custard into a bowl and press a piece of plastic wrap on the surface of the custard to prevent a rubbery skin forming. Chill for at least 1 hour.**
When the custard is cooked, cool to approximately 20–30°C (70–85°F) – it will take about 30 minutes at ambient temperature – stirring regularly to prevent a skin forming.
The custard can be cooked the day before and gently warmed back to target temperature in the microwave or over a double boiler.
When the custard is cooled, place it in a stand mixer bowl with 160 g (51/2 oz) of the butter and the crème fraîche. Attach the whisk and whip on speed 5 (medium) for 3–4 minutes. Stop and scrape down the sides a few times.
Don’t panic! At this stage, the mix will look lumpy and sometimes a broken/ split mess, but the hot brown butter will elevate the temperature and bring it back to smooth and creamy. If the buttercream still looks broken after adding the brown butter, elevate the temperature again by scooping out a heaped spoonful, warming it to melty hot, then streaming it back in.
Keep warming and whipping, and never ever give up on a but tercream!
While the mix whips, cook the remaining 80 g (23/4 oz) butter over a medium–high heat until it’s a light toasted brown and bubbling hot. Immediately slow the mixer to low speed and stream the butter slowly into the custard mix while the mixer is still whipping. Stop and scrape the sides, then increase to speed 8 (under high) and whip for another 5–6 minutes to smooth fluffiness.
* If you haven’t been moving the custard well enough as it co oks, you will notice brown flecks of overcooked custard starting to show. To fix this, use a spatula to push the custard through a sieve into a clean bowl at the end of cooking.
** If, after chilling, the custard appears gloopy then it’s undercooked. Simply return it to a saucepan over a low heat and VERY slowly bring it to the boil again.


